[an error occurred while processing this directive]
[an error occurred while processing this directive]
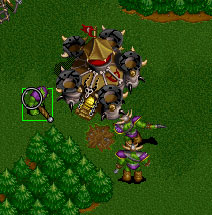
Hopping peons across land
 Everyone, at some point while playing Warcraft 2, has built a wall to free a trapped peon. If you haven't done this before, I suggest
you actually try playing the game before reading this. The picture on the right is a classic example. I was cramped for building space.
After repairing my mound, I knew the peon would pop out to the left side and be trapped. This is easily fixed by building a wall. It forces the peon
to pop out to the closest available spot on the map. This is land hopping. I'll use that simple idea of hopping over buildings, and
show you how it can be used in different situations.
Everyone, at some point while playing Warcraft 2, has built a wall to free a trapped peon. If you haven't done this before, I suggest
you actually try playing the game before reading this. The picture on the right is a classic example. I was cramped for building space.
After repairing my mound, I knew the peon would pop out to the left side and be trapped. This is easily fixed by building a wall. It forces the peon
to pop out to the closest available spot on the map. This is land hopping. I'll use that simple idea of hopping over buildings, and
show you how it can be used in different situations.
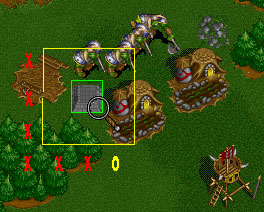
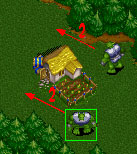
Top left on Garden of War
This is probably the most recognized land hop in the game today, so I'll use it as an example to get you started.
|
|
If the enemy uses a wallin like this one (and most people do), you can easily hop across it with just 1 peon and 2 grunts.
The 2 grunts block the only available spots that are immediate to the wall. The peon will now be forced to hop somewhere once
the wall is cancelled or completed. The first picture shows you how to predict where the peon will hop.
Because every spot around the wall is blocked, you can imagined an imaginary box that is 3x3 in size (the size of a barracks).
The peon will 'act' like he is building something of this size when you cancel the wall. As you can see, the peon appears in position '1' of this made up, 3x3 size building.
If that position was blocked by an enemy wall, the hop would not work. The peon's first available position would
be below your grunts at position number '7' as indicated in the picture. Once your peon is inside, you have a few options. You can build a barracks right against his,
if you suspect he has a catapult building. This will force his catapult to pop out on the right side of his barracks. If he has a tower upgrading like in the
above example, you can run the peon to
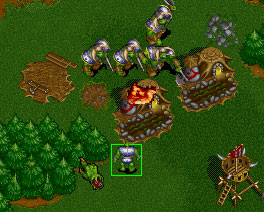
A typical wallin
 Here is a wallin you might see in a game. It is relatively safe. There are as many repair spots for his peons, as there are spots for your grunts
to attack. But you can actually hop in at either side of this wallin, using 4 grunts and 2 peons. If you are already rushing, and find an enemy setup
like this, hopping over his wallin isn't the first thing you are going to think about, but it is easily done. You already have the grunts, so hopping
becomes inexpensive. The hop at 11 is used because people are familiar with it. Hopping like this can be used in LOTS of situations, but people just
aren't looking for it. Here are the 2 ways to do this one...
Here is a wallin you might see in a game. It is relatively safe. There are as many repair spots for his peons, as there are spots for your grunts
to attack. But you can actually hop in at either side of this wallin, using 4 grunts and 2 peons. If you are already rushing, and find an enemy setup
like this, hopping over his wallin isn't the first thing you are going to think about, but it is easily done. You already have the grunts, so hopping
becomes inexpensive. The hop at 11 is used because people are familiar with it. Hopping like this can be used in LOTS of situations, but people just
aren't looking for it. Here are the 2 ways to do this one...

|

|
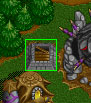
This one is a little more confusing than any previous examples. Again, because the wall is surrounded, it will not act like a building that is 3x3 in size.
I've represented this with the yellow box. The 3 red x's on the grunts, and
the 3 red x's on the enemy farms, show you that the first available 6 locations are blocked. The peon is forced to appear where the yellow circle is. Now let's see the other side
of the wallin.
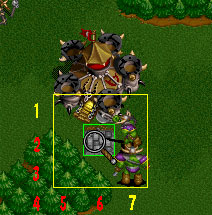
I think you can figure out what all this means by yourself. The wall is surrounded, so it is now like a 3x3 building. All the popping
positions around this 3x3 building are blocked until you get to the other side of the wallin. Simple.
Something to look for...
 When you run across a wallin, pretend an enemy mage is on the other side of the wallin. If this mage could attack you with his lightning attack (range of 2)
than you probably can hop the wallin very easily. Both of these peons in this example, can hop across just by having 2 grunts block them. Remember, as with any type
of hop, hopping to the left is easier than hopping towards the top right. If you are trying to hop over a barracks towards the top right of the screen, you will need
to block with more units and buildings than it's worth. It is hard to get into the habit of looking for peon hops when you are in a game, but they have some creative uses.
If someone walls a cat behind your mine, see if you can hop a peon in. If you need a peon outside of your wallin for whatever reason, you might be able to hop a peon
out.
When you run across a wallin, pretend an enemy mage is on the other side of the wallin. If this mage could attack you with his lightning attack (range of 2)
than you probably can hop the wallin very easily. Both of these peons in this example, can hop across just by having 2 grunts block them. Remember, as with any type
of hop, hopping to the left is easier than hopping towards the top right. If you are trying to hop over a barracks towards the top right of the screen, you will need
to block with more units and buildings than it's worth. It is hard to get into the habit of looking for peon hops when you are in a game, but they have some creative uses.
If someone walls a cat behind your mine, see if you can hop a peon in. If you need a peon outside of your wallin for whatever reason, you might be able to hop a peon
out.
So I got my peon across. Now what?
You have a few options. Start building a barracks right against his wallin where you hopped your peon over. If you can make
it so your barracks makes one of his farms unrepairable, then your grunts can easily take it down before your barracks finishes.
Cancel the barracks and you are inside his base.
If he doesn't have any barracks inside, than he has no choice but to kill your barracks with towers, or with ALL of his peons attacking it right from
the moment you start building it. Once he has some towers upgrading around it, cancel it and move it out of range from the towers.
Do this as many times as you can to make them waste resources on useless towers. If it's early in the game, you might be able to get something
right in their peon line to really mess them up.
Back (Water Hopping) | Top | Forward (Chop Hopping)
[an error occurred while processing this directive]