
Question:
The map is classic Garden of War, and I'm at s9 (mid left) after moving from 8 (bottom left). I am humans.
My opponents are at 11 (top left), and 2 (right-side, top). My partner is at s6 (bottom middle). What should we do?
-Submitted by Reikan
Answer:
This is one of the hardest situations to win from on any map. You and your ally got dealt the worst 2 spots on the map,
and your allies not only got 2 of the best, they have 2 spots that counter most of the strategies that you could try.
Rushing is impossible. You are already behind, and could never keep up. Peon warfare is out of the question because his ally
at 2 will kill any attempts that you have at it. Two-Halling is suicidal. This leaves you with a 1 Hall power. Not only
are you left with very few options, but you also have to deal with his scout peon.
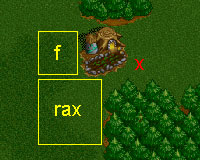
Your Hall position is the first problem you have to deal with. You basically have 2 choices of where you can built it. Both of these positions are setup specifically for not allowing an enemy peon to do much damage.
|
|
|
Another big problem you will face is when the enemy just sticks a barracks in your peon line and let's it build. This forces you to stick up at least 1 guard tower. It may not seem like much, but you are already behind from moving, and have an inferior position to his. If you do need a guard tower, place it below your mine so it covers the enemies barracks, and the offensive tower that is possible to the right. Your top should be walled, and you should have your ballista started already. You are going to need it.
I tend to lean towards the lower Hall placement. It doesnt let one enemy peon restrict you as much. One building cannot restrict access to certain sides of your Town Hall. If you do like building your Hall in the higher position, remember that you can hop a peasant below the Hall, by blocking the first available popping position with a peasant, wall, or building.
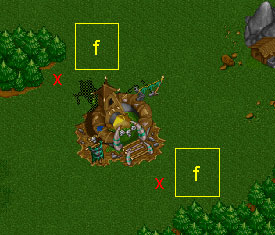
The Farm Spot
 Lots of players will
build a farm here in order to stop you from sending multiple peasants up to cause havok in their city. If an enemy does this (no
matter what the position of his building) use your own buildings to force his peon back to the outside of your wallin.
Get all your buildings going, and start your ballista as soon as possible. The farm position in this picture is where most
players will build this farm. It forces you to build 2 buildings to pop their peon back, but as I have illustrated, it is still
easily done. Remember that you should wall this in yourself if the enemy doesn't. You don't want any more than 1 enemy
peon inside your wallin, and the enemy at 2 prevents you to do any serious damage with your peons. With your 1 scout peasant, you
should try to get a barracks in his line. Stop his mining operations for as long as you can. Most players will chop the tree
next to their Hall if you do get a barracks in their line. Once the enemy chops this tree cancel your barracks and build a farm.
This will keep them off their gold mine for awhile, and maybe enough that you can catch up. Make sure you stop their peon before it
can build a second building!
Lots of players will
build a farm here in order to stop you from sending multiple peasants up to cause havok in their city. If an enemy does this (no
matter what the position of his building) use your own buildings to force his peon back to the outside of your wallin.
Get all your buildings going, and start your ballista as soon as possible. The farm position in this picture is where most
players will build this farm. It forces you to build 2 buildings to pop their peon back, but as I have illustrated, it is still
easily done. Remember that you should wall this in yourself if the enemy doesn't. You don't want any more than 1 enemy
peon inside your wallin, and the enemy at 2 prevents you to do any serious damage with your peons. With your 1 scout peasant, you
should try to get a barracks in his line. Stop his mining operations for as long as you can. Most players will chop the tree
next to their Hall if you do get a barracks in their line. Once the enemy chops this tree cancel your barracks and build a farm.
This will keep them off their gold mine for awhile, and maybe enough that you can catch up. Make sure you stop their peon before it
can build a second building!
Powering
Now you try to one Hall power like a madman. If everything went well early on, than the enemy only built 1 farm in your
city before you killed the peon, and you got a Barracks in his peon line. Even if you couldn't get a barracks going in his base,
you are still alright as long as he couldn't do anything to you as well. Get all of your necessary buildings started so you can
build a ballista. Take 1 peasant, and scout the top treeline to check if top left is trying to chop into you from above. There
are 3 spots that only require 2 chops, so make sure you check them all. Your goal now is to get a Keep fast. Fifteen peons at the most before
upgrading to Keep. Get your second barracks started so it is done before your stables. Start pumping knights
until you have 4-6. Start chopping out around now, and you will have 8-10 by the time the peasant finishes chopping the tree.
If all goes well, this should be enough knight power to run over any grunts that enemies had been building up. If top left chose to power,
than you will be hitting his wallin about the time he his upgrading to Fortress. Don't sweat it. You don't even have to get inside of his base
to kill him. Bring your ballista up and set it up to the right of his wallin against the trees. Tell it to attack ground in
the enemies peon line. If the enemies can't get through the knights to kill the ballista, or find some other way to kill it,
than the top left player is in some big trouble.
Your Ally
Your ally is left to defend for himself, but usually will only be attacked by the enemy at 2. I seriously suggest he reconsiders staying at 6:30 instead of moving to s6. The 30k
mine at bottom middle takes too long to walk to, is too hard to wall, and has a very slow 2 hall no matter where he goes with it.
In this circumstance (you guys being 6 and 8), and 1 barracks defend rush works very well. Bottom middle is always scouted late, and
as such, your ally will have lots of time to setup some defense. He can also send a few extra grunts out to kill any enemy catapults
that are sent your way. When I do the spot of the day for staying at 6:30 (GoW) I'll show you a REALLY good 1 hall power for this. Just remember
that he doesn't want to repair anything, and he should be sending peons onto gold early, in order to keep up in the resource game. Setup a 4 on 3,
with a few grunts for back up, and use a catapult behind them (or a cannon tower).
If he is set on moving, than I suggest he 2-Halls to 5 as fast as he can, and chops the 2 trees that connect the 2 spots. Try to defend everything with just 1 catapult. It is hard to do, but any more defense will put you so far behind that it's not worth it.
Remember...
This is almost as non-flexible as a pure cookbook strat. Rushing is out of the question, and there is no way you will out power your enemies, so it
only leaves you with a small door of opportunity during the keep stage.
I won't lie. These positions are very hard to win from. You HAVE to kill 11 (or 2) somehow if you plan on winning the game. Footies will never
get the job done, so get those knights fast. If you can't take out one of them at the Keep stage, than you will lose 99% of the time.
Back | Top [an error occurred while processing this directive]