[an error occurred while processing this directive]
[an error occurred while processing this directive]
Staying 6 - Garden of War
 I'm not going to try to fool anyone, this is just a horrible spot. If you stay you will be behind. If you move to the mine
above 5 you will be behind, and if you move to the mine below 9 you will be behind. But I also believe that what you learn on this page
will change the way you play when staying at 6.
I'm not going to try to fool anyone, this is just a horrible spot. If you stay you will be behind. If you move to the mine
above 5 you will be behind, and if you move to the mine below 9 you will be behind. But I also believe that what you learn on this page
will change the way you play when staying at 6.
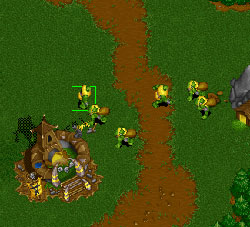
Hall Placement
Not much choice here is there? You have 4 different spots you can build your Hall, all of which are the same distance
away from the mine. I almost always go with my Hall as low as it can go because it gives you more building room later on.
Your mine is so far away that you don't have to worry about peon jams.
Because your mine is further away compared to other spots,
you lose the ability to do some things.
Repairing will slow you down - You want to get away with not having to repair anything. Sometimes it
is necessary to repair, but it is better if you can get away without it.
Get peons mining early - Don't overbuild buildings to start with. Once you have your barracks and smith going
you can start putting peons on gold. The early gold allows you to keep up with other spots.
Two Rax rushing is slow - It takes awhile before you can afford to get your 2nd barracks without doing a
peon stop. Wood is hard to come by here so 2-rax rushing is rarely worth it.
You don't want to be chopping wood without a mill - The wood here is far away. If you are chopping without
a finished mill, then your peons are walking big distances to return the lumber to the Hall.
Two-Halling is impossible - And hidden 2-Halling is one of the most risky strats on the map (especially from this spot).
That's not all...
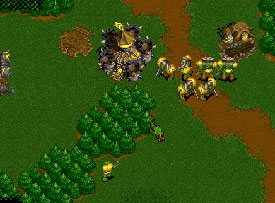
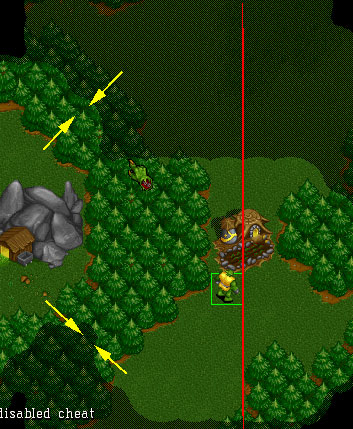 Unfortunately the backside of your goldmine is a mess as well. You are easily towered or catted from the right. In order to
survive this spot, you need to know how everything works. This picture demonstrates some important points. First of all, that
red line running through the middle of the picture shows you where a cannon tower WILL hit your peons from. As long as
no part of the enemies tower crosses that line (to the right side of it), the tower will kill your peons. Look at how much room that gives the enemy
above the farm. The 2 walls most people build to stop towers up there actually do not cover all the spots. It can be covered
with 3 walls, or better yet, 1 farm. The farm also gives you the vision so you know the moment the offensive tower his being
built. The other thing to note are those yellow arrows. They simply show you where you can chop through this treeline in 2 chops.
If you take 2 peons, and chop in the direction of the arrows, you will be cut through. This is incredibly useful, but rarely used. I'll show you
how this works further down this page. Just remember that it is better to spend the money to prevent getting towered instead of
having to wait for a cat to finish.
Unfortunately the backside of your goldmine is a mess as well. You are easily towered or catted from the right. In order to
survive this spot, you need to know how everything works. This picture demonstrates some important points. First of all, that
red line running through the middle of the picture shows you where a cannon tower WILL hit your peons from. As long as
no part of the enemies tower crosses that line (to the right side of it), the tower will kill your peons. Look at how much room that gives the enemy
above the farm. The 2 walls most people build to stop towers up there actually do not cover all the spots. It can be covered
with 3 walls, or better yet, 1 farm. The farm also gives you the vision so you know the moment the offensive tower his being
built. The other thing to note are those yellow arrows. They simply show you where you can chop through this treeline in 2 chops.
If you take 2 peons, and chop in the direction of the arrows, you will be cut through. This is incredibly useful, but rarely used. I'll show you
how this works further down this page. Just remember that it is better to spend the money to prevent getting towered instead of
having to wait for a cat to finish.
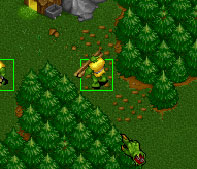
Some more information on the offensive towers
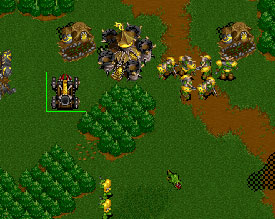
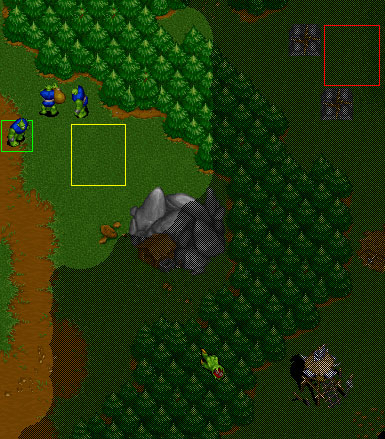 See that white enemy tower there? If this happens to you then you have lost. There is alot to be learned here, however.
The only way to destroy this tower now, is to build a catapult. This is a complete waste of time, and will set you back
minutes behind your enemy. Most of the time you will have 9 enemy grunts running rampant in your base as your cat is about
to finish. The easier way to prevent this is to place a watch tower in the spot shown by the yellow box. The watch tower will
let you see everything that is happening behind you here. If the enemy starts building a tower, start upgrading yours. This
will prevent any back-side tower jobs, as well as defend the choke point that leads into your base. Also notice the 2 walls
I built at the back. These actually don't help me one bit. An enemy tower placed in the red box would still kill my peon line, and
I woudln't even suspect a thing (no vision from the walls, as seen in this picture). Right now I am waiting for my catapult to
finish. It would of saved me alot of trouble if I just had that watch tower there to start with...
See that white enemy tower there? If this happens to you then you have lost. There is alot to be learned here, however.
The only way to destroy this tower now, is to build a catapult. This is a complete waste of time, and will set you back
minutes behind your enemy. Most of the time you will have 9 enemy grunts running rampant in your base as your cat is about
to finish. The easier way to prevent this is to place a watch tower in the spot shown by the yellow box. The watch tower will
let you see everything that is happening behind you here. If the enemy starts building a tower, start upgrading yours. This
will prevent any back-side tower jobs, as well as defend the choke point that leads into your base. Also notice the 2 walls
I built at the back. These actually don't help me one bit. An enemy tower placed in the red box would still kill my peon line, and
I woudln't even suspect a thing (no vision from the walls, as seen in this picture). Right now I am waiting for my catapult to
finish. It would of saved me alot of trouble if I just had that watch tower there to start with...
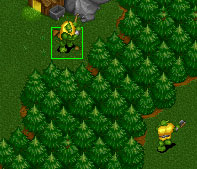
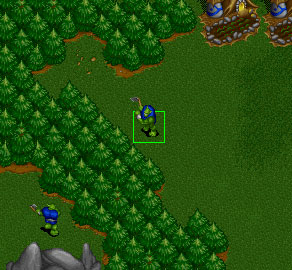
Defending the back side
As you have seen in previous pictures, you can block the bottom part of your backside by using one farm. This causes one of your peons
to be stuck. This is where the 2 chops come in. To make up for the long distance to your Hall, you need all of your peons gathering
resources. If you use the farm back there to wall the enemy out, take a peon off gold and chop towards your trapped peon. The
other peon chops back and makes a hole through the trees to go through.
|
|
At this point in the game you will still need gold more than wood, so put both peons back onto gold when they come back
out of the Hall.
This still leaves the top vulnerable to cannon towers and cats, but at least it is harder for an enemy to setup high. Of
course...you could wall high yourself.
|
|
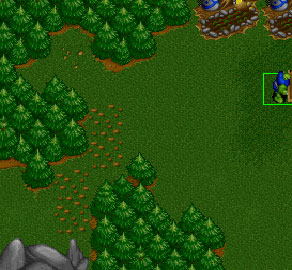
The peon in the 2nd picture is actually bringing the wood back to my lumber mill, which I used to wall the right side of
the top there. This definately keeps any enemies out from behind your mine, and puts your mill where there is alot of lumber.
The problem is that a cannon tower doesn't really defend everything. In fact, a cannon tower only protects your choke point, and
leaves your buildings further out from the choke point vulnerable. Something has to change.
The choke point
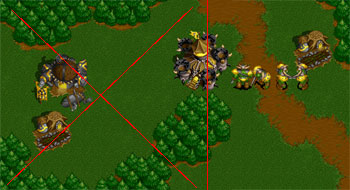 Now we see even more problems with this spot. A cannon tower that can defend your backside and choke point, does very little
for any buildings out towards the left. Anything in the red x'ed area is vulnerable. If the enemy has more grunts than you,
then you will lose the smith, farm, and eventually the barracks (can only repair it with 1 peon). Building everything behind your choke point doesn't work either.
You will run out room very quickly. You won't even have space for a 2nd barracks or lumber mill. You could build another cannon
tower behind your choke point. That would do the job but is starting to cost you more than it's worth. Luckily there's a clever
way to do this.
Now we see even more problems with this spot. A cannon tower that can defend your backside and choke point, does very little
for any buildings out towards the left. Anything in the red x'ed area is vulnerable. If the enemy has more grunts than you,
then you will lose the smith, farm, and eventually the barracks (can only repair it with 1 peon). Building everything behind your choke point doesn't work either.
You will run out room very quickly. You won't even have space for a 2nd barracks or lumber mill. You could build another cannon
tower behind your choke point. That would do the job but is starting to cost you more than it's worth. Luckily there's a clever
way to do this.
 The farm building in this picture changes everything. Now all my units will pop down, stuck in between my barracks and smith.
Now, notice the peon chopping the tree out there...can you figure out what's going on? This picture is from a real game where
I 1 rax rushed (didn't repair anything), scouted, and found my enemies rushing. I continued to build grunts constantly until
I had my lumber mill complete. Remember that a 4 on 3 setup is not THAT strong. Three enemy grunts means that they can target
1 of yours with all 3. If you don't have backups then you will die. Make sure you have a few back up grunts before starting the
catapult.
The farm building in this picture changes everything. Now all my units will pop down, stuck in between my barracks and smith.
Now, notice the peon chopping the tree out there...can you figure out what's going on? This picture is from a real game where
I 1 rax rushed (didn't repair anything), scouted, and found my enemies rushing. I continued to build grunts constantly until
I had my lumber mill complete. Remember that a 4 on 3 setup is not THAT strong. Three enemy grunts means that they can target
1 of yours with all 3. If you don't have backups then you will die. Make sure you have a few back up grunts before starting the
catapult.
The Result
 The catapult is done, and the peon has chopped the 1 necessary tree that allows the catapult full access to my base. This cat
can help you defend the choke, take out anything that hits your smith from the left, AND defend against towers from the right.
Even if you chose the high wallin on the right, your cat can get over there to defend that as well, because of the 2 trees
you chopped earlier in the game. If you know the heavy grunt rush, or cat rush is coming, you can continue to pop grunts to
the inside of your base. Send a few out to see if you can catch some stray cats, or at least so you know that 25 grunts (give or take)
are headed your way. You should also start taking out the trees below your barracks, so you can repair with more, and get your
grunts and ogres around easier.
The catapult is done, and the peon has chopped the 1 necessary tree that allows the catapult full access to my base. This cat
can help you defend the choke, take out anything that hits your smith from the left, AND defend against towers from the right.
Even if you chose the high wallin on the right, your cat can get over there to defend that as well, because of the 2 trees
you chopped earlier in the game. If you know the heavy grunt rush, or cat rush is coming, you can continue to pop grunts to
the inside of your base. Send a few out to see if you can catch some stray cats, or at least so you know that 25 grunts (give or take)
are headed your way. You should also start taking out the trees below your barracks, so you can repair with more, and get your
grunts and ogres around easier.
Some stuff to remember
-This is not what you have to do from this spot each game! Just like any other spot, you will be sending your first few grunts
out to see what's going on. You don't want to be powering when the enemy is right above you at the mine below 9. So get those peons
out and scout. You might find a 2-Haller, or a powerer, or an enemy that you could simply outrush. You easily get peons out all over the
map for expansions, or offensive towers, or whatever it may be, so don't commit yourself to one strategy too soon.
-Also remember that your gold mine is a few spots further than all of the other mines. So when you are about to go stronghold, don't.
Build an extra 1 or 2 peons before going Hold, and the extra resources will keep you right with or ahead of your enemy.
-Most players will not expect you to go from a rush, to a defensive setup either. This means that most players will just plan to run you
over with their grunts. When they run into your newly built farm, that allows you to repair all buildings safely, then they
will be in trouble. It makes their cats too slow, and yourself quicker to power than they ever could.
-Peon scouting WILL sometimes pay off, whether it be straight up the left side of the map, or to the bottom right area. You
could get a good offensive tower, or barracks on the enemy and it will still probably take them a little while until they figure
out where you came from. You can also catch a 2-Haller this way, and if the enemy didn't see your peon...all the better.
-Don't chop the same tree like I am in the last picture :).
Back | Top
[an error occurred while processing this directive]