Peons appear on the right side of the Hall. An extra step to walk but you can get alot more peons mining before they get stuck.
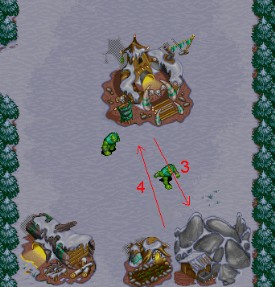
Peons appear below the Town Hall after returning gold.
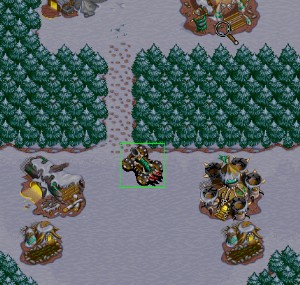
Middle on Classic Maze
Note: this is NOT a starting spot on the BNE version of this map.
This is probably the most interesting spot on Maze because there is so much that can happen from here. Being placed in the middle
of the map keeps you relatively close to all of the other starting positions. There is alot you can do, and alot you have
to watch out for.
Hall Placement
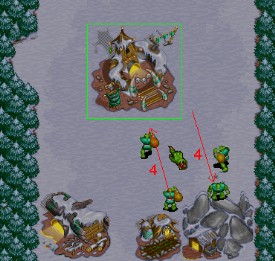
There is an imaginary line that you can think of, that runs up from the left side of your gold mine. If you align the right
side of your Hall with it, your peons walk a different route as compared to any Hall built further to the right.
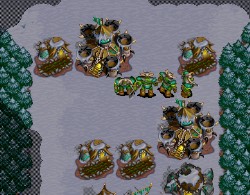
|
Peons appear on the right side of the Hall. An extra step to walk but you can get alot more peons mining before they get stuck. |
Peons appear below the Town Hall after returning gold. |
Notice that in both instances, the peons appear from the mine from the left side. If this position is blocked, they will look for the next available position going counter-clockwise. The farm you see here, blocks the next 2 available spots, and forces peons to appear way over against the right trees. In the first picture, you can see the right-most peon carrying gold was forced out over there. It is still a direct path to the Town Hall (3 steps), instead of being 5 steps away if the farm was not there. These are the 2 best positions for your Hall to be placed. I wouldn't recommend going any further left or right because of space concerns.
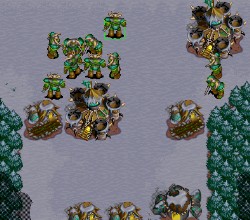
Watch it...
Throughout the early part of the game, you constantly have to watch the right side of your trees. By chopping 1 tree,
an enemy can get a cannon tower close enough, that it will take out your peon line quickly. If you don't have enough resources
for your own catapult (or lack the ability to pop it inside your wallin), or enough resources for your own cannon tower, than
your game is pretty much over. Even if you have to pull all your peons to wait for your catapult to finish, than you are going
to be way behind. Here's what the enemy sees...
|
|

|

|
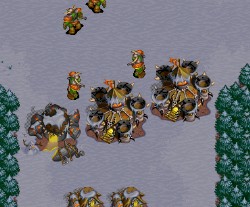
If this happens, pull all your peons off gold so they don't die needlessly. Start building a catapult as soon as you can. Because that cannon tower can't be repaired, you can also take 2 peons and stick up your own tower (MAKE SURE you have 5 spaces in between your tower, and his). Use the second peon to repair where he won't be taking splash damage from the enemy cannon fire. Eventually your tower will be finished, and the enemy will no be able to repair his tower as yours slowly takes it down.
Walling in
The next problem you have is the choice of available wallin positions. You can wall up high on the left and right (2 wallins to defend), or
straight across the top of the right treeline (1 longer wallin to defend). You will have to try both to see what you prefer.
Me? I almost always take option 2. Walling across the right and left sides, really limit what you can do. The ability to be
hit from both sides also makes it a real pain to defend. Here's what I do use that wallin for.
 This is a 2-Hall that makes use of walling up high like this. Make sure you send your first peon out to take this mine.
The faster you get your second Hall started, the faster you will be able to upgrade. It takes 4 chops to cut the path
from your main to the expansion. You don't need to worry about this immediately, so keep the peons going on gold for the first
little while. Your cat can defend most of your 2nd Hall from this side of the trees. Chopping through allows that catapult
to take out any offensive towers that the enemies try to put up later. Also note that both sides of your wallin require
multiple 'chops' to cut to the outside. This is really annoying to do later. You never know where you will have to send your
units so you are usually forced to chop out both sides. Remember that you are in the middle of the map. Enemies will be on you
very quick.
This is a 2-Hall that makes use of walling up high like this. Make sure you send your first peon out to take this mine.
The faster you get your second Hall started, the faster you will be able to upgrade. It takes 4 chops to cut the path
from your main to the expansion. You don't need to worry about this immediately, so keep the peons going on gold for the first
little while. Your cat can defend most of your 2nd Hall from this side of the trees. Chopping through allows that catapult
to take out any offensive towers that the enemies try to put up later. Also note that both sides of your wallin require
multiple 'chops' to cut to the outside. This is really annoying to do later. You never know where you will have to send your
units so you are usually forced to chop out both sides. Remember that you are in the middle of the map. Enemies will be on you
very quick.
Rush Setups
Even some more problems occur here. The width of your 'bay' of trees is 9 spaces wide. It is really hard to make a wallin
that is 9 wide, because size 2x2 buildings (farms) and size 3x3 buildings (smith, barracks) don't add up too nicely to 9.
In fact, the only way to add to 9 by only using 2s and 3s is with three, 3's. Luckily we can always turn to the good 'ol
choke point instead. There are many setups possible (of course). The following are 4 of those possibilities. The last picture
is about the only way you can wall directly across.

Remember choke points can always be reversed. It is probably better to keep your grunts on the outside of this wallin. If you are outnumbered in a grunt war, you can easily sneak 2 grunts back inside to setup the choke. |
I'm a big believer of walling everything except for a 1 farm space. Again, you can keep your grunts outside. If you suspect, or are getting outrushed, than stick the last farm up to finish the wallin. Grunts alone will never get through. |
If you are pretty sure you can outrush the enemy, build your second barracks on the outside. You can still maintain a 2 on 1 choke if someone tries to hit you from the right. No screwing around here. Get those catapults and kill the enemy. |
This is about the only way to wall across 9 spaces. Make sure you move your grunts immediately so your next 2 don't pop behind your wallin. You will end up with an outside peon with this wallin, so build hidden farms where ever you can. |
Rushing from middle isn't all that bad. You can quickly get to all the starting positions (with the exception of bottom left). Two cat rushes and offensive towers can work for most of your games from this position.
Why don't you wall up higher then? If you build your buildings to fit into the 'indents' found in the
trees, your repair to hit ratio will be absolutely terrible. If you are a fan of unrepairable barracks (stick farms and a cannon
tower underneath the barracks to force the grunts to pop up) than go for it.
Powering
You get a little cramped when doing a 1 Hall power with the 'across the top' wallin, but it is still easily done with intelligent
building placement. Make sure that you can chop out with 1 chop. This way you aren't wasting any time trying to get your ogres
outside of your own base. Preferably, you will chop out with your first 2 ogres and setup a 2 on 1 with your catapult as backup.
The longer you stay walled in the more trouble you will be in. If an enemy brings a catapult before you can get chopped out,
than you will be in some real trouble. Being as 2-Hall orientated as maze is, 1-Hall powering usually only works when the enemy
is close. Send all your ogres and your cat and to take one of the 2-Hallers cities. A power like this will easily run over
a rusher.
Two Halling, Hidden 2-Halling
It's hard to check all the mines on this map so 2-Halling works wonders. Take an expansion where you don't need too many buildings
to wallin. There are alot of places where you can 2 Hall to. An option is to peon scout top left. If an enemy is there, start
the peon warfare up. If it is unoccupied, then take it as an expansion. There are a lot of mines that you can take from middle
pretty quickly. Left of top-mid, absolute top-right, left of mid-right, and above bottom right are all excellent examples of
2 Halls that are easy to defend (and sometimes never even found).
If you want to try 2-Hall rushing, than take a 2nd mine that isn't TOO far away. You want to get your second base going as soon as you can. Use top-left, below top-left , or above your main as the expansion. They are all relatively close and easy to wallin.
Back | Top [an error occurred while processing this directive]