[an error occurred while processing this directive]
[an error occurred while processing this directive]
Plains of Snow - Top Right
This is a pretty good spot. There is alot you can do with it on high, and low resources. Because your wallin
is located to the left of your Hall, it is a little harder to do a 1 Hall power with a cat, and next to impossible to get a cat inside
once you have already started rushing. The further you wall out to your left, also causes your wallin to be hittable by more units. It is
very hard to find a good balance of building room, and defense from this position.
Hall Placement
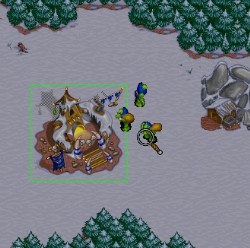 The hall placement is very simple at this location. You really only have 2 viable options. In this picture, you can see that I have my Hall 2 spaces
off of the top of trees. This allows you to get peons to the mine by going above or below your Townhall. This is an important feature in peon warfare. This means
that the other place you can get away with build your Hall, is up one more. The other 2 available building positions place your
Hall against the top or bottom trees. You always want to avoid a Town Hall against trees. It allows the enemy to wall you out of your gold mine with just one peon.
Keeping space on both sides of your Hall, force him to stick a building right inside your gold flow, which is alot easier to deal with. Another good point about this spot
is that you can peon scout down and really hurt someone if an enemy is there. The starting position below this one, has no room from the Town Hall position to the gold mine.
Peon scouting with your first peon allows you to get a barracks in between there, and prevents the enemy from mining gold for a very long time.
The hall placement is very simple at this location. You really only have 2 viable options. In this picture, you can see that I have my Hall 2 spaces
off of the top of trees. This allows you to get peons to the mine by going above or below your Townhall. This is an important feature in peon warfare. This means
that the other place you can get away with build your Hall, is up one more. The other 2 available building positions place your
Hall against the top or bottom trees. You always want to avoid a Town Hall against trees. It allows the enemy to wall you out of your gold mine with just one peon.
Keeping space on both sides of your Hall, force him to stick a building right inside your gold flow, which is alot easier to deal with. Another good point about this spot
is that you can peon scout down and really hurt someone if an enemy is there. The starting position below this one, has no room from the Town Hall position to the gold mine.
Peon scouting with your first peon allows you to get a barracks in between there, and prevents the enemy from mining gold for a very long time.
Rushing
 This is a simple setup for a 1 barracks setup (only get the cannon tower if you need it). The buildings are this way for a
few reasons. First of all, notice the Smithy on the top treeline. If you place your smith here every game, it is easy to remember how these wallins went. That building position also
gives your peons 1 more space to repair versus the number of units that can attack it. The rest of this wallin can be changed to your liking.
If you want to go 2 barracks, than you can take out the 2 farms at the bottom , and put a second barracks there. If you are afraid
that you will be cramped by doing that, than stick your second barracks below the smith (on the outside of the wallin). The cannon tower
will still cover it that far out, so it is pretty safe from grunt attacks. If you like setting up choke points, take out the farm 2nd from
the bottom and you will have a 3 on 2 setup. Move the cannon tower up one spot, and you can fit your 2nd barracks right below the farm and tower.
There is alot you can do with this, so I recommend you play around with it. What I do not recommend is that you wall out any further. The path gets
wide very quickly and becomes a large wallin that is hard to defend. The attacker will also have many more spots to hit your wallin, than you have
to repair with.
This is a simple setup for a 1 barracks setup (only get the cannon tower if you need it). The buildings are this way for a
few reasons. First of all, notice the Smithy on the top treeline. If you place your smith here every game, it is easy to remember how these wallins went. That building position also
gives your peons 1 more space to repair versus the number of units that can attack it. The rest of this wallin can be changed to your liking.
If you want to go 2 barracks, than you can take out the 2 farms at the bottom , and put a second barracks there. If you are afraid
that you will be cramped by doing that, than stick your second barracks below the smith (on the outside of the wallin). The cannon tower
will still cover it that far out, so it is pretty safe from grunt attacks. If you like setting up choke points, take out the farm 2nd from
the bottom and you will have a 3 on 2 setup. Move the cannon tower up one spot, and you can fit your 2nd barracks right below the farm and tower.
There is alot you can do with this, so I recommend you play around with it. What I do not recommend is that you wall out any further. The path gets
wide very quickly and becomes a large wallin that is hard to defend. The attacker will also have many more spots to hit your wallin, than you have
to repair with.
Note: it takes several chops to get to the outside of this wallin. Make sure you have a peon chopping over here as soon as you can. You never know
when you will need to get outside with peons. The 'remove the 2 bottom farms and put a barracks' suggestion allows you to chop
out with 1 chop.
Heavy Rushing
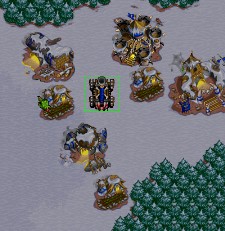
 Again, there are several ways you can setup 2 barracks for a heavy rush. In the above paragraph on rushing, the option where
I told you to move your tower up 1 position and stick your second barracks below it, is an example of a good heavy rush setup.
Usually when your ally is not going to be helping you rush at all, you will have to get defense. This is where this setup comes in handy.
You can pump alot of grunts, without any major threat from your opponents. If they bring 2 catapults, you should have more than
enough grunts to take them down. Make sure you are always grouping your grunts together as soon as they are completed (as seen
in the picture). If you don't like the complete wallin, then take out the top farm and setup a 4 on 2 instead. You have room for a mill below
your gold mine, and plenty of room for farms above your Hall. Also use your outside peon (you will have one) to build hidden farms somewhere on the map,
so inside peons can be dedicated to resource gathering. You will have plenty of wood chopped by the time you need to build an ogre mound.
Again, there are several ways you can setup 2 barracks for a heavy rush. In the above paragraph on rushing, the option where
I told you to move your tower up 1 position and stick your second barracks below it, is an example of a good heavy rush setup.
Usually when your ally is not going to be helping you rush at all, you will have to get defense. This is where this setup comes in handy.
You can pump alot of grunts, without any major threat from your opponents. If they bring 2 catapults, you should have more than
enough grunts to take them down. Make sure you are always grouping your grunts together as soon as they are completed (as seen
in the picture). If you don't like the complete wallin, then take out the top farm and setup a 4 on 2 instead. You have room for a mill below
your gold mine, and plenty of room for farms above your Hall. Also use your outside peon (you will have one) to build hidden farms somewhere on the map,
so inside peons can be dedicated to resource gathering. You will have plenty of wood chopped by the time you need to build an ogre mound.
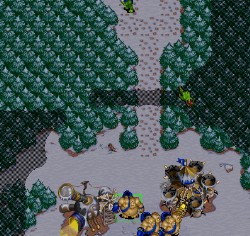
Remember that there is only one route to get to the top right. By leaving a scout grunt down the path a little ways, you will
always see what is coming ahead of time. If your grunt gets run over by 9 grunts of different colored enemies, than it might be well-advised
to hide what grunts you have in order to kill any catapults that are positioned behind the enemy grunts. A cannon tower will hold off any number
of grunts alone, so just run your grunts away. Let them chase all they want.
Powering
 Here is a quick little 1 Hall power setup. You can probably tell that powering from this position has it's disadvantages.
To begin with you end up being very cramped. There is actually another setup where you stick your barracks on the bottom treeline, and wall
towards the left, and up. It makes your wallin go pretty far to the left, but it does give you more room. The second problem is that your mill
is part of your wallin. There is no deception here at all. As soon as the enemy finds you, he has a pretty darn good idea of
what you are doing. Plains of Snow is a wide open map, so a 1 Hall power constitutes being very fast. Powering to lust will get you killed almost
every game. Because the map is of this nature, you will be going Keep quick...maybe 14-15 peons. As such, you will not have much lumber chopped at this time (so not much
'man-made' building room). You will be using all the available space you have. Your ogre mound and second barracks can fit below your gold mine. Chop out
as soon as possible (2 or more ogres), and set them up in a choke-point position.
Here is a quick little 1 Hall power setup. You can probably tell that powering from this position has it's disadvantages.
To begin with you end up being very cramped. There is actually another setup where you stick your barracks on the bottom treeline, and wall
towards the left, and up. It makes your wallin go pretty far to the left, but it does give you more room. The second problem is that your mill
is part of your wallin. There is no deception here at all. As soon as the enemy finds you, he has a pretty darn good idea of
what you are doing. Plains of Snow is a wide open map, so a 1 Hall power constitutes being very fast. Powering to lust will get you killed almost
every game. Because the map is of this nature, you will be going Keep quick...maybe 14-15 peons. As such, you will not have much lumber chopped at this time (so not much
'man-made' building room). You will be using all the available space you have. Your ogre mound and second barracks can fit below your gold mine. Chop out
as soon as possible (2 or more ogres), and set them up in a choke-point position.
An interesting alternative is to setup your base like a rush immediately. Build 1-2 grunts at the most and scout around the map. Make sure you find a rushing enemy, and
then stick up a defensive cannon tower. Hopefully you will have misguided them enough to think that you are rushing. Get your mill immediately and go Keep around 15 peons.
The problem with powering, with a cannon tower as defense, is that good players will tower your wallin so their towers are out of range of your cannon tower.
Hopefully the couple of scout grunts will throw them off long enough to let you power to ogres before they can get towers all over you. Ultimately a catapult is a lot safer.
Two-Halling, Hidden 2-Halling
One of the unique features of top-right, is the ability to 2 Hall. Because you can keep your wallin farely small here, it gives
you enough resources to setup an expansion quickly somewhere else. You have a few options for this. Top left is pretty good.
Sending your first peon there will get the city setup fairly quick. Sending your 1st and 3rd peons there will get it walled in
almost always before enemy grunts can get there. Above bottom left can also be walled in very quick, but is usually found
a little faster than top left is. Bottom left is another good spot. It takes your peon a little while to get down there, but
will often be overlooked if the enemy finds you at your main base first. Expanding to a right-side mine is out of the question.
The wallins require way too many buildings for it to be practical.
On low resources...
 This spot is one of, and might be the best low resource spot in the game (for milling). Your Hall is close to ALOT of lumber.
This allows you to use your mill as part of your wallin without sacrificing the availability of wood. What most enemy players will do
is setup towers that will hit the edge of your wallin, or hit anything that tries to come outside from your base. A good trick to do, is
to chop out below your mine. On low resources it is easily done. You can be chopped out before your stronghold upgrade is even complete.
There's lots of building room out here, and the enemy won't know where the heck all those ogres came from. I even use this chop-out trick
when I do a low resource 2-Hall. If the enemy thinks you are contained, than it will work wonders. If the enemy catches this, than you will
be forced to get an inside catapult. 40,000 gold isn't that much on low resources, so I would recommend you stop building peons, and pump as
many high level ogres as you can. You will need them all to get through the enemies towers/grunts.
This spot is one of, and might be the best low resource spot in the game (for milling). Your Hall is close to ALOT of lumber.
This allows you to use your mill as part of your wallin without sacrificing the availability of wood. What most enemy players will do
is setup towers that will hit the edge of your wallin, or hit anything that tries to come outside from your base. A good trick to do, is
to chop out below your mine. On low resources it is easily done. You can be chopped out before your stronghold upgrade is even complete.
There's lots of building room out here, and the enemy won't know where the heck all those ogres came from. I even use this chop-out trick
when I do a low resource 2-Hall. If the enemy thinks you are contained, than it will work wonders. If the enemy catches this, than you will
be forced to get an inside catapult. 40,000 gold isn't that much on low resources, so I would recommend you stop building peons, and pump as
many high level ogres as you can. You will need them all to get through the enemies towers/grunts.
Back | Top
[an error occurred while processing this directive]