[an error occurred while processing this directive]
[an error occurred while processing this directive]
Mine the Center - Bottom Left
This is an interesting land map to begin with, but it's even better when you get this spot. There is alot you can
get away with including a fast 2 hall because of the close expansion.
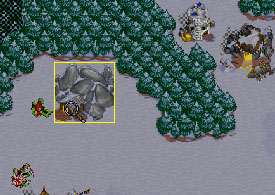
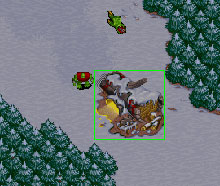
Hall Placement
 No matter where you build your hall below this mine, your peons will have to walk 4 spaces to get to the mine instead of 3.
Any place where your hall is to the left of the gold mine, your peons will come out of the mine on the left side, causing themselves an extra step.
If you try moving your hall so the left side of your hall, and gold mine are flush with each other, then the peons will come out of the mine properly,
but appear along the left side of your town hall instead of above it. If you really want to fix this (3 steps each way) you have to build your hall on the left side of the mine AND
build 2 walls, and 2 farms to block the left and right sides of the mine. This will force the peons out the bottom of the gold mine, but it does sacrifice
the available lumber. The screenshot used is where I prefer my hall. It gives you enough building room for everything, and also keeps you away from where the
enemies will be attacking, and off of the edge of the map. The left side of this picture is the edge of the map. You do have 4 squares below the hall to work with as
well, and should provide enough room for any farms you need until the keep stage. Play around with it. Two, three, and four squares off the edge of the map all work well
for high resources. Building your hall far to the right gives you some closer lumber for low resources.
No matter where you build your hall below this mine, your peons will have to walk 4 spaces to get to the mine instead of 3.
Any place where your hall is to the left of the gold mine, your peons will come out of the mine on the left side, causing themselves an extra step.
If you try moving your hall so the left side of your hall, and gold mine are flush with each other, then the peons will come out of the mine properly,
but appear along the left side of your town hall instead of above it. If you really want to fix this (3 steps each way) you have to build your hall on the left side of the mine AND
build 2 walls, and 2 farms to block the left and right sides of the mine. This will force the peons out the bottom of the gold mine, but it does sacrifice
the available lumber. The screenshot used is where I prefer my hall. It gives you enough building room for everything, and also keeps you away from where the
enemies will be attacking, and off of the edge of the map. The left side of this picture is the edge of the map. You do have 4 squares below the hall to work with as
well, and should provide enough room for any farms you need until the keep stage. Play around with it. Two, three, and four squares off the edge of the map all work well
for high resources. Building your hall far to the right gives you some closer lumber for low resources.
Cannoned!
 You can be offensive towered with a cannon tower. The spot where the cannon is in the picture OR up and left one spot, will
both kill your peon line easily. Walling out further can prevent this, but it makes your wallin very vulnerable to heavy grunt attacks.
If you see someone starting a tower here, simply repair yours and upgrade it first. If you get caught by this without noticing, micro-manage a grunt
back and forth to draw its' fire, until you have enough gold (or time) to get your catapult. Of course if a cannon tower can reach from there,
there is a possibility the enemy will-in wall a catapult above your wallin. Just keep your catapult off your wallin a little ways, so he
doesn't shoot too early.
You can be offensive towered with a cannon tower. The spot where the cannon is in the picture OR up and left one spot, will
both kill your peon line easily. Walling out further can prevent this, but it makes your wallin very vulnerable to heavy grunt attacks.
If you see someone starting a tower here, simply repair yours and upgrade it first. If you get caught by this without noticing, micro-manage a grunt
back and forth to draw its' fire, until you have enough gold (or time) to get your catapult. Of course if a cannon tower can reach from there,
there is a possibility the enemy will-in wall a catapult above your wallin. Just keep your catapult off your wallin a little ways, so he
doesn't shoot too early.
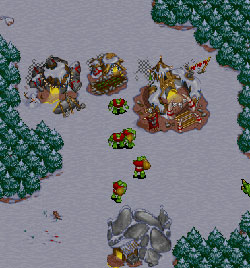
Rushing
 Most of the time you will be facing a heavy rush on this map. Every second counts in this game, which is why the second barracks, and smith (is even further left than this picture shows) are
built closer towards your town hall. You don't want to be sending all of your peons way to the right to build over there, simply because it will
put you behind in the grunting and upgrade race. Of course you will be scouting from the moment that your first is grunt. As long as you know what the enemies are up to, it
is not absolutely necessary to wallin right away. Setting up a 4 on 2 like this, gives you alot more options. You can send peons out to tower the enemy if you need, or build a farm that
is aligned with the top of your barracks (the higher barracks in this picture) for a quick wallin.
Most of the time you will be facing a heavy rush on this map. Every second counts in this game, which is why the second barracks, and smith (is even further left than this picture shows) are
built closer towards your town hall. You don't want to be sending all of your peons way to the right to build over there, simply because it will
put you behind in the grunting and upgrade race. Of course you will be scouting from the moment that your first is grunt. As long as you know what the enemies are up to, it
is not absolutely necessary to wallin right away. Setting up a 4 on 2 like this, gives you alot more options. You can send peons out to tower the enemy if you need, or build a farm that
is aligned with the top of your barracks (the higher barracks in this picture) for a quick wallin.
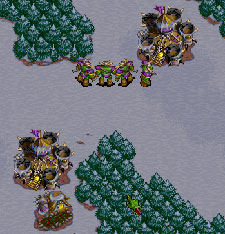
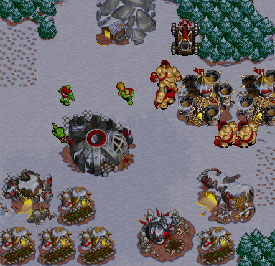
Rushing - Team Games
 Sometimes when your ally is feeling a little adventurous (and 2-halls), you will have the task of defending 2 grunt-rushing enemies, and keeping catapults
and towers off of your ally. When you get stuck in this circumstance, I do suggest you wallin completely. Either rush heavy with 1 barracks, and a cannon
tower to back you up, or use a 2 barracks, peon stop. Get as many grunts at the highest level you can. If you can keep them off your ally, then he will easily take
both enemies down. In the example provided, the cannon tower keeps the wallin safe, and protects against from the offensive tower spots. If you want 2 barracks for this, then
build them side by side as the bottom of your wallin and use farms to make sure your grunts pop down below your wallin.
The cannon tower stays in the same place, and a blacksmith or farm will your top side in.
Sometimes when your ally is feeling a little adventurous (and 2-halls), you will have the task of defending 2 grunt-rushing enemies, and keeping catapults
and towers off of your ally. When you get stuck in this circumstance, I do suggest you wallin completely. Either rush heavy with 1 barracks, and a cannon
tower to back you up, or use a 2 barracks, peon stop. Get as many grunts at the highest level you can. If you can keep them off your ally, then he will easily take
both enemies down. In the example provided, the cannon tower keeps the wallin safe, and protects against from the offensive tower spots. If you want 2 barracks for this, then
build them side by side as the bottom of your wallin and use farms to make sure your grunts pop down below your wallin.
The cannon tower stays in the same place, and a blacksmith or farm will your top side in.
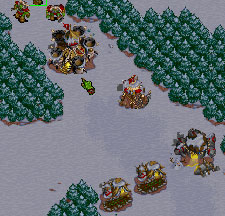
Powering
This is a small map, so enemy rushes will be intense, and the 2 cat rushes will be coming fast. Do not go for fort when you power, or 2 hall. Stay at keep for awhile
and make sure you have lots of ogres ready for the onslaught.
Here is a good way to wallin, the top and right sides.
A 1 hall power - safely pumping ogres
|
A mill where there is more wood
|
I prefer walling in like this because it makes it a whole lot easier to get your units out later. If you wall the top with a 3x3 size building, it will require
at least 2 chops to get out, and will still be very crowded. The farm at the top, is easily defended, and will also make your life much easier later in the game.
Make sure you get your keep fast. Repair your mound if you can and chop out as soon as you have ogres. Set up a 2 on 1, or even a 1 on 1 where have chopped out.
Once you get about 6 ogres you can safely venture out into the unknown.
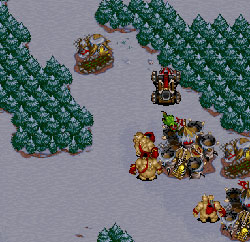
Two-Halling
 One of the unique features of this starting spot is an easily accessible, and wallable expansion. The wallin used here works great. This walls in your entire
right side safely, with no fear of peons popping out on the wrong side of the hall. A farm can be used (as seen above), to wall the top side of your base.
Repair what you can, and you'll have a catapult before they can do any damage. The one catapult is all you will need to defend the rushes here. Try to get ogres
to defend against 2 cat rushes, instead of going with a heavier defense. You should be able to pull this off if you are efficient.
Again, go keep as soon as you can, even if it means going keep a little earlier than you are accustomed to.
If you can get enough ogres to defend against the rush, than the you will have an easy win. Beat the enemy back and use your defensive catapult as an offensive weapon.
They will not be able to stop all of your ogre power, and the catapult will rip them apart.
One of the unique features of this starting spot is an easily accessible, and wallable expansion. The wallin used here works great. This walls in your entire
right side safely, with no fear of peons popping out on the wrong side of the hall. A farm can be used (as seen above), to wall the top side of your base.
Repair what you can, and you'll have a catapult before they can do any damage. The one catapult is all you will need to defend the rushes here. Try to get ogres
to defend against 2 cat rushes, instead of going with a heavier defense. You should be able to pull this off if you are efficient.
Again, go keep as soon as you can, even if it means going keep a little earlier than you are accustomed to.
If you can get enough ogres to defend against the rush, than the you will have an easy win. Beat the enemy back and use your defensive catapult as an offensive weapon.
They will not be able to stop all of your ogre power, and the catapult will rip them apart.
Cramped Powering
 Because the map is so small, early peon scouts, or repair rushes will force you to wallin with very little space. Everything I have showed you so
far, has wall-ins that are a little ways so you never run out of room. If you are forced to wall off at the first opening you have, then you
have to use all of your available room. That's one of the reasons that I recommend the town hall towards the left more. You can see how I had enough room
for a quick 1 hall power. By using all my available room, I am able to fit in 2 barracks, and enough food to support anything at the keep stage. If you want
try a little cookbook strategy, then wallin like this on purpose and go keep with only 14 peons. Do a peon stop, and pump level 4-5 ogres from 3 barracks at the keep stage.
Use your catapult to break into any defense that they try to setup.
Because the map is so small, early peon scouts, or repair rushes will force you to wallin with very little space. Everything I have showed you so
far, has wall-ins that are a little ways so you never run out of room. If you are forced to wall off at the first opening you have, then you
have to use all of your available room. That's one of the reasons that I recommend the town hall towards the left more. You can see how I had enough room
for a quick 1 hall power. By using all my available room, I am able to fit in 2 barracks, and enough food to support anything at the keep stage. If you want
try a little cookbook strategy, then wallin like this on purpose and go keep with only 14 peons. Do a peon stop, and pump level 4-5 ogres from 3 barracks at the keep stage.
Use your catapult to break into any defense that they try to setup.
Hope this helps.
Back | Top
[an error occurred while processing this directive]