[an error occurred while processing this directive]
[an error occurred while processing this directive]
One Way In, One Way Out - Top Starting Spot
Despite what most players assume, this map does not have to be a rush fest every game. Both starting positions
can easily setup a choke point, or be walled in completely with a fast catapult. Here are some building positions that I've used
with success.
Hall Placement
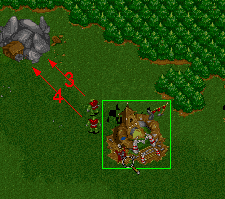
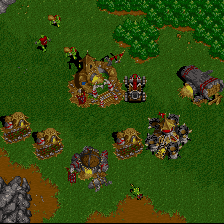
 This is one of your options for placing your hall. The far left side of this image is the edge of the playing screen. The hall in the picture is then,
3 squares off from the edge of the map. When your hall is placed anywhere below this mine, your peons will come out the mine, on the right side. If this spot
is blocked, then they are forced to the next available space in a counter-clockwise position. That is why the farm and wall
are there. Now the peons will pop out of the mine from the bottom left.
What this does...
Forcing the peons to pop out of the mine on the left, AND having your hall 2 or 3 squares off the edge of the map, make it so your peons only have to walk 3 spaces to get back to the town hall. If
the farm and wall were not there, the peons will pop out the right side of the mine. This causes them to be 4 steps away from the hall, and even more once you start mining heavy. If you build your hall
more than 3 squares from the edge, then the peons have to walk an extra step to the right (making it 4 steps) to get to the hall. Peons coming
out of the hall will appear from the left side, and continue counter-clockwise if the available space is blocked. So once you get alot of peons mining this mine, peons will be
forced further down the left side of the hall. Unfortunately you can't too much about this. If this really concerns you, you could wall around your entire hall, while leaving the top open. The peons
will be forced all the way around, and will come out from the top right. Usually not worth it though.
Hall Placement # 2

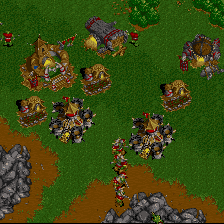
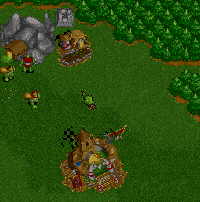
This is another good placement for a fast gold flow. Again, the peons come out of the hall from the top left, and then counter-clockwise from there. The 2 peons
you see in the picture occupy the 1 and 2 spots. As you can see, the top peon has to optimum 3 spot walk to get to the mine. Peons that get forced down further (when you are mining heavier), have
to walk further. The same applies for the gold mine. The first spot that they will pop out of the mine, is only 3 squares away from the hall. Any other peons that are forced
up the right side of the mine, will have to walk further to return the gold. In the early game when you don't have many peons, the gold will be very fast. The more peons you have, the worse it will get.
So which one do I use?
I prefer the first example on high resources, and the second one for low resources. The second hall placement puts your hall right against the trees. On low
resources, you can do a heavy rush, and you will still have some pretty close lumber later on in the game. The hall to the right of the mine on low, also makes your gold flow that much faster.
I do not like putting my hall against the trees on high, because peons have to walk around the hall to build other buildings to
the right of your hall. On low, these trees will be chopped out by the time that you have to send peons that way. The first option is simply faster for a high resource rush.
Rush Setups

A heavy rush setup
|

A good setup for a rush / power option
|
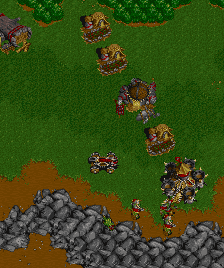
The first picture of the 2 above is a good setup for rushing. Your buildings are all fairly close, so you can get them
started immediately, and don't have to walk other peons far to repair. It also leaves you with a 4 on 2 setup, and the option for a cat or cannon tower
if you get stuck inside your base. The problem you will find with this, is that you will be hurting for building room. An ogre mound fits nicely on the left
side of your hall, but your farms will end up being cramped. Moving your buildings to the right causes a bad ratio of potential attackers, to potential repairers on
your bottom building. If you are a good rusher, send a peon to the outside and build farms there. Or stack some farms against the wallin if you know you won't get outrushed.
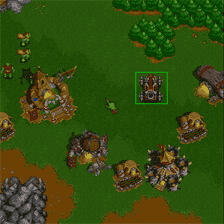
The second setup you see above is a little more flexible. As you can see, you setup your choke further to the right. The peons take a little longer to walk out there,
so your rush will be a little slower. This setup has its' advantages however. First of all, you have alot more room to build. A second barracks, mound, alchemists, and all the farms you
ever need can fit safely behind the wallin. You also only need 2 grunts to setup the choke point. A two on one is a powerful setup. A two on one with 1 backup grunt and cat will take down ALOT of enemy grunts.
Because of this, you can quickly switch from a rush to power (before you start your second barracks), depending on what your scout grunt finds.
Which one?
You decide. I use both depending on what I feel like. There are hundreds of variations you can use. I like these 2 because they
have a good balance of offense and defense.
One Hall Powering
Remember that this is a small map, with only 2 starting positions. A power on this map has to be fast. A low number of peons; repairing your mound, and not
going fort are all necessary. A 1 hall power is primarily an anti-rush strategy, on this map. If you repair the necessary buildings, you can even have a cat fast enough
to defend against a 5 peon tower job.

One hall power. Hall is 2 squares from the left edge of the map
|

One hall power. Hall on the right side
|
Both of these work pretty well. The first example has more room on the right side of the hall. It makes it easier to get your
ogres out later in the game. The problem is trying to get all your peons inside the wallin. If you do get some peons stuck outside. Use them to chop trees on
the un-walled side of your mill, or send them down to bottom right to build some hidden farms.
The right picture isn't as cramped as it looks. You can fit your second barracks and mound against the
left side of the map. It is a little annoying later, having to send ogres from your second barracks under your hall. Sometimes they will get caught up and stop.
You can use your catapult to pop grunts or ogres to the outside of your wallin. I tend to lean towards the first one. It is easier to get everything set up.
Back | Top
[an error occurred while processing this directive]
 This is one of your options for placing your hall. The far left side of this image is the edge of the playing screen. The hall in the picture is then,
3 squares off from the edge of the map. When your hall is placed anywhere below this mine, your peons will come out the mine, on the right side. If this spot
is blocked, then they are forced to the next available space in a counter-clockwise position. That is why the farm and wall
are there. Now the peons will pop out of the mine from the bottom left.
