[an error occurred while processing this directive]
[an error occurred while processing this directive]
How Sappers and Demos Work
Sappers (and Demo Squads) are probably the most underused unit in the game. These guys can cripple an enemy
in seconds, when used properly. Unfortunately, with the faster game speeds, it becomes harder to use these guys
because you have to be more concerned about building ogres than anything else. However, in a ladder game, or any
slower game speed, these guys become one of the most potent units.
Sappers and Buildings
Sappers do 400 points of damage to any building that they demolish. This is an important number for several reason.
First of all, a farm only has 400 hit points, so a sapper will always kill a farm in one hit. The picture on the right shows a demo squad taking out
2 farms. A mound/stables, smith, mill, temple,
alter/church, roost/aviary, and an alchemist/inventor (these are buidlings with 500-775 hp), will all die to 2 sappers even if a peon repairs the building
a few times after the first sapper hits. A barracks has exactly 800 hit points. Two sappers will take out a barracks,
but if a peon is able to repapir the barracks just once, after the first sapper hits, then the barracks will not die. This is a very important
fact whether you are the one attack with sappers, or the one defending. A Town Hall has 1200 hp, and a Castle/Fort has 1600. These can obviously
be taken out with 3 or 4 sappers respectively.
In order to have the sappers demolish where you want them to, you can use the demolish hotkey (d), on a square of ground.
This will cause the sapper to demolish on exactly the point that you tell them to. This is a much easier way to 'aim' the explosion.
Just be careful that you have the area well scouted. If you try to demolish the ground through the fog of war, and new
buildings have been built there, the sapper will just damage the first building it runs into.
Remember, a sapper HAS to be right next to a buliding in order to damage it. The demolish command only has a range of 1 when it comes to units or buildings.
However, you will see that this is a little different with trees in the next section.
Sappers and Trees/Rocks
Sometimes you need to get into an enemies base, when they have walled in using multiple buildings. If 1 sapper is all you have,
take a good look at the trees beside the wallin. Alot of times you will be able to get in by blowing a hole through the trees. Let's take a look
at how sappers work when blowing up trees.
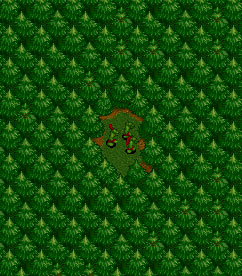
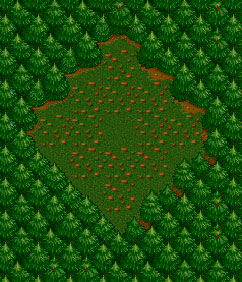
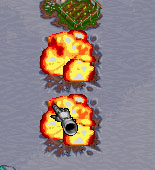
The 2 above images are there to illustrate the distance that sappers make when blowing up trees or rocks. As you can see, directly left, right, up,
or down from the sapper caused 2 spaces of trees to be cleared out. The diagonal directions from the sapper only exploded a distance
of 1 into the trees. This is how sappers always work when dealing with trees. They will blow up a distance of 2 spaces in
any direction (up, down, left, right), and a distance of 1 in any diagonal direction. The same applies for blowing up rocks.
A lot of times while playing, you'll find players who wallin with multiple buildings, making it very hard to sap into the enemies base.
When this is the case, take a look at the trees around the wallin as well. Many times you can find a spot that will make a big enough
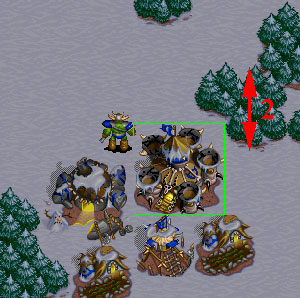
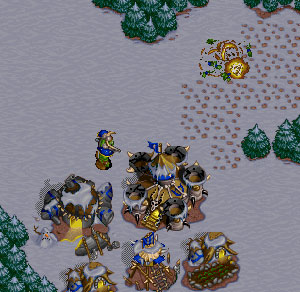
hole for you to get in. The following 2 pictures were taken at the bottom right position on Plains of Snow.
A well placed sapper grants you access to the enemies base. You want to make sure your ogres/grunts are following closely behind so the enemy
does not have time to fix the hole. I was sure my sapper was going to hit the right place because I told him to demolish the space of ground
that is right above that red arrow. Notice how the grunt looks to the right to see what is going on.
Sappers and Units
Sappers kill any unit with their demolish command. If you tell a sapper to patrol, they will demolish at the first enemy they
come into contact with, whether it is a building or a unit. Usually when you do use the patrol command, and click towards some enemy units,
the sapper will run into the lead unit, and blow him up, just killing the 1. This isn't very efficient. Usually you will have more success if you
tell your sapper to demolish ('d') the 2nd or 3rd unit in the group. Even if they are running towards you, your sapper
will run right by the first enemy, and will blow up the 2nd or 3rd, usually taking more units with it.
Really, all I am saying here is that the patrol command on sappers is not that useful. You can usually do a much better job of
it yourself by targetting specific units (and buildings).
Later on, I'll be getting into more specific strategies using sappers
Strategy - Main | Top |
[an error occurred while processing this directive]