Grunt Hopping
Grunt hopping is hard to do, and is really only useful on 1 map, that being Nowhere to Run, Nowhere to Hide. On this page
I'll include 'instructions' on how to do it so you know what to do, if you want to try it yourself. I'll also give
you two very good cookbook hops, that actually win games on Nowhere to Run.
|
|
|
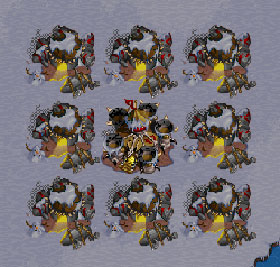
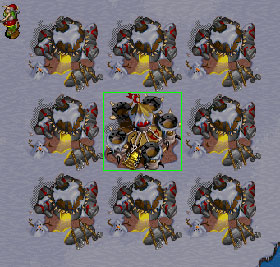
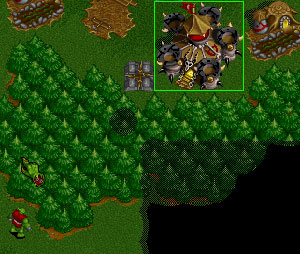
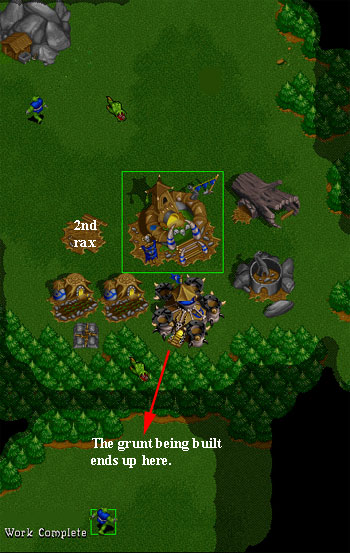
The above to pictures is the basic idea behind grunt hopping. If you've read the previous pages on hopping, you understand what happened here. Instead of the barracks acting like a 3x3 size building, it acts like a 9x9 size building because it is surrounded. The grunt pops out in the first available position, as seen in the picture. Now imagine that the 3 blacksmiths on the left side of the barracks were actually trees. The grunt would still appear in the same position, but it would of hopped over 3 rows of trees to get there.
But, like I said above, this isn't really all that useful. In order to get grunts across trees, you have to use alot of buildings to surround the barracks with. If the enemy were to see this, a couple of towers would easily stop you. Anyone who has played alot of Nowhere to Run, Nowhere to hide (Nwtr), has probably had someone try grunt hopping on them. Even if you are unaware of it, you can easily kill the first grunt, and then build some towers along the trees where the grunts are hopping from. Your goal is to use the towers to block any available spots on your side of the trees, forcing the enemies grunts back over to his side.
 However...the order I will show you here is a little better for a grunt-hop strat. You'll see why as we go through it. You should know
that Nwtr is usually played on fixed order so it ends up being top against the bottom. That is, colors red and blue against teal and purple. This is example
is used to hop grunts from red (top right) to purple (bottom right). The picture
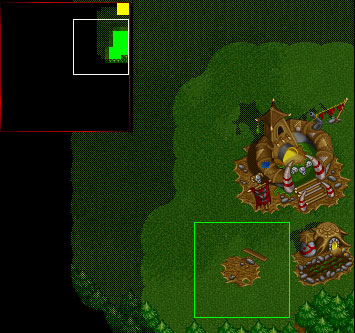
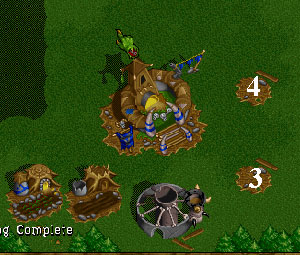
on the right contains the 3 buildings that peon 1 builds. In the remaining pictures, the number represents which peon built that structure.
One thing you have to notice in this picture is that the Town Hall is NOT as close as possible to the mine. I built it down an extra space
to make everything fit. If you use this build, you HAVE to leave an extra space from your Hall to the mine. YOU HAVE TO!
However...the order I will show you here is a little better for a grunt-hop strat. You'll see why as we go through it. You should know
that Nwtr is usually played on fixed order so it ends up being top against the bottom. That is, colors red and blue against teal and purple. This is example
is used to hop grunts from red (top right) to purple (bottom right). The picture
on the right contains the 3 buildings that peon 1 builds. In the remaining pictures, the number represents which peon built that structure.
One thing you have to notice in this picture is that the Town Hall is NOT as close as possible to the mine. I built it down an extra space
to make everything fit. If you use this build, you HAVE to leave an extra space from your Hall to the mine. YOU HAVE TO!
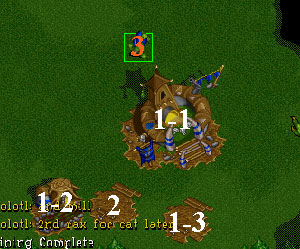
You start the game, and your peons builds your Town Hall an extra space from the mine, right against the right edge of the map. The first farm goes below your Hall, and the barracks right next to the farm. Your 2nd peon will be building...
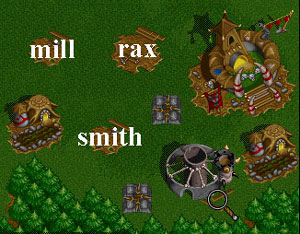
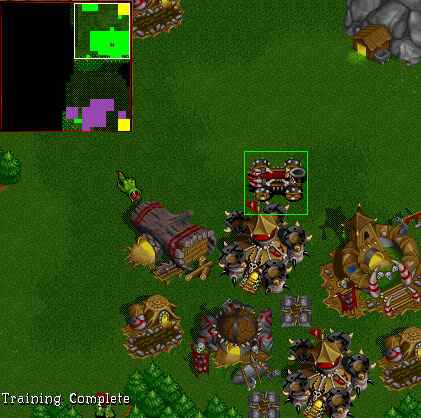
 First of all, thanks goes to Aguro and Uncle1125 for wasting their time so I could remembering the numbering. It's hard to build
walls in single player games :). The numbers on the picture represent the peon, and what number of building they built. For example, the Hall, farm, and barracks are
represented by 1-1, 1-2, and 1-3. This is the first, second, and third building, that peon one built. 3-2 means it's the second building
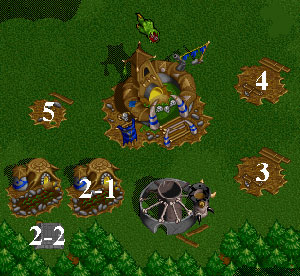
that peon 3 built. The picture should now explain itself. Peon 2 builds the farm on the left, and peon 3 builds a wall at the bottom. Peon 4 starts the other wall, and
peon 3 will start the smith (3-2). When 4 is done building the wall, he starts a second barracks (4-2), and peon 2 who finishes that farm will build a lumber mill there.
Peon 5 is heading the wrong way...he will be put on gold.
First of all, thanks goes to Aguro and Uncle1125 for wasting their time so I could remembering the numbering. It's hard to build
walls in single player games :). The numbers on the picture represent the peon, and what number of building they built. For example, the Hall, farm, and barracks are
represented by 1-1, 1-2, and 1-3. This is the first, second, and third building, that peon one built. 3-2 means it's the second building
that peon 3 built. The picture should now explain itself. Peon 2 builds the farm on the left, and peon 3 builds a wall at the bottom. Peon 4 starts the other wall, and
peon 3 will start the smith (3-2). When 4 is done building the wall, he starts a second barracks (4-2), and peon 2 who finishes that farm will build a lumber mill there.
Peon 5 is heading the wrong way...he will be put on gold.
The next couple of pictures shows you what buildings are which, and what happens after the first barracks is complete...
|
|
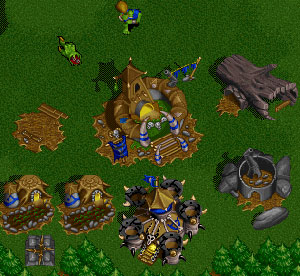
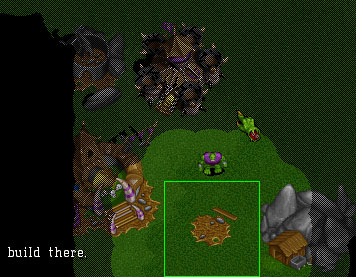 This is what makes this grunt hop a little different, and much more potent. You get to hop 1 peon into their base before
any grunts are in there. You will be very surprised what this peon could do to the enemy. Usually you can block off their gold
supply completely, although this person forced me to build my barracks low in their line. But...that isn't what usually will
win the game for you. For some reason when the enemy sees the peon, they completely forget that there are grunts following it up.
This is what makes this grunt hop a little different, and much more potent. You get to hop 1 peon into their base before
any grunts are in there. You will be very surprised what this peon could do to the enemy. Usually you can block off their gold
supply completely, although this person forced me to build my barracks low in their line. But...that isn't what usually will
win the game for you. For some reason when the enemy sees the peon, they completely forget that there are grunts following it up.
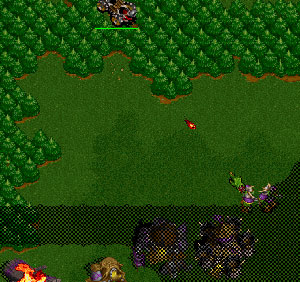
But it's still a little better than that. That second rax you built has to have some kind of purpose. Your second barracks, starts a catapult as soon as you can afford it. This way if the enemy does do a decent job of defending the hop rush, you aren't just going to roll over and die. Usually someone will either tower up, or build their own grunts to stop yours. This means that you usually can get a catapult before they can. Even if they don't cancel their catapults that are building, you still have the option of hopping grunts over to get them. The 2 pictures below here explain the rest of this game. I was able to use 2 grunts to setup a 2 on 1 under their mill. I killed most of their peons with my grunts, and had a catapult long before they did (because they chose to defend with grunts).
|
|
It's a cookbook strategy. You have to know exactly where, and in what order to build your buildings in. If you are going to try this, I suggest you practise it several times before hand. When you get into a real game, it's easy to panic and screw something up, and 1 little building mistake and you will look like the biggest newbie ever to play the game. All your buidings stuck in the range of his cats, and your 'rush' stuck on your side of the map.
Blue to Teal
And because I can, I'll show you how to do the same hop from blue to teal. Try either of these a few times and I guarantee that they
will win quite a few games. Below are the pictures and the numbers needed to do this hop. Special thanks to ~Blackangel for hosting
a game so I could start at blue's position and fool around with the correct order again. Especially since Kith-Kanin is usually at this spot when we play,
so I didn't know this one off by heart. Once again, the numbers represent the peon number, and the order of buildings that they build. Also notice that the
Town Hall HAS to be 1 extra space away from the gold mine again.
|
|
|
|
The idea is to use your peon to block or limit the enemies path to his goldmine. They have to worry about that peon, and the grunts that you will be hopping to their side as well. The 2nd barracks, starts a catapult as soon as possible.
Strategy - Main | Top | [an error occurred while processing this directive]