![]()
Small water maps on high resources
Back in the day when the igl War2 ladder was immensely popular, players were always looking for easy win by playing 'pet' settings.
Simply put: a strange map that they could use the same strategy for each time. During this time, I had a winning
streak that was starting to add up. When I was around 25 wins in a row, people kept asking me to play them on X Marks the Spot. I
knew how the map worked, and I had a good idea on what people were going to do, so I made up a couple of cookbook orders
for the map. The following is what I used on X Marks the Spot on high resources, for my little run on the ladder. This
order beat a bunch of players who used X Marks as their pet setting.
3 Juggs
When 1 jugg attacks 2, it has no chance of even killing one of them, if both players are equally skilled. When 2 juggs attack
3, they MIGHT be able to sink one if they can get 2 full hits on one ship. This is why this works. It will give you 3 juggs, versus
their 2. Most of the time, you should be able to win with all 3 of yours. After winning this first battle, you can start working on his foundry. When their
third and fourth juggs are done, go sink those too. If you don't feel confident enough to switch from foundry razing to another jugg war, then just sit your ships
1 square out of range of one of their shipyards. As soon as the new ships are complete, your juggs will sink one of them, leaving you with 2-3 and them with 1.
An easy battle.
The order
I have 2 different orders for this. One is more flexible, allowing you to get a faster fouth jugg, and defend against grunt rushes.
The other is an order that is just as fast as a repaired 2 yard, but you use 3 yards. The latter is better only if you know
someone is going to try a 4 jugg rush, or sub rush against you.
Below are the 2 build orders. Even further down I will explain them in more detail.
|
Order 1 - More flexible
Peon 1 - Builds Hall, farm, and then a mill.
|
Order 2 - Faster ships
Peon 1 - Builds Hall, farm, and then a mill.
|
Order 1
The first order has no repairing until the peon from shipyard 2, repairs the foundry. This will be a little slower
than someone who repairs 2 yards heavy, but it usually doesnt matter because of the time it takes to sail to the enemy.
If the enemy is on your shipyards before yours are done, than that is even better. Yours will pop out and sink his before
he has time to move them.
The beginning of the order is very simple. When peon 5 is done, walk him to the shore where you are going to build your shipyards. The farm will finish a little before the mill, so bring both of those peons over to the shore at the same time. Start all 3 shipyards together. Peon 6 builds your third farm. Peons 7 and 8 both have to go onto wood (giving you 2 on gold, 2 on wood). Peon 9 and 10 both go on gold. Now your shipyards will finish. The first peon out builds the foundry. The peon from the second shipyard repairs the foundry, and the third peon can go on gold. Peon 11 and 12 will both go on gold as well. Now you just wait until the foundry is done. You should have just enough resources for 3 juggs right when it finishes. Build all 3 juggs, and the 13th peon. Put the 2 peons who built the foundry onto wood, and then pull 5 peons from gold to wood. When your juggs are finished you will be at 16/13 for food. Repair your next farm with any other gold peons you have, and get your 4th jugg going only if you need it. If it is un-needed start another farm and a barracks.
Make sure you wall out along the shore. If someone is doing a quick rush, you can trap their grunts on the outside of your wallin, and pick them off with juggs.
Order 2
The second order is just as fast as a repair 4 jugg order, but it uses less peons. This makes it harder to quickly get all
of the necessary buildings for a catapult, if you have to take an island back from an expander.
The first peons are always the same. Number 1 does the hall, the first farm, and then the mill. Peon 2 does farm 2. Peon 3 repairs the mill (just like a 4 jugg order).
Peon 4, and the 2 peons who just finished the mill, ALL build yards. Farm 2 will finish around now, and will go on wood. Peons 5, 6, and 7 all go on gold (4 gold, 1 lumber).
Peon 8 repairs the first shipyard that you started. Don't build any more farms or peons. When the repaired shipyard is done, start the foundry, and repair it with 1. The 2 other
shipyards will finish now. One peon can go repair the foundry (2 peons repairing foundry now), and the other can go on gold. When the foundry is done, build 3 juggs.
You should meet the enemies 2 juggs in between the starting islands, with your 3. An easy victory. I suggest that you only this order if you know your enemy 2 yard juggs, or sub rushes. It is alot harder to stop an expander, or rusher with only 8 peons.
Both of these are designed to bring your resources to 0 when you start the 3 juggs building. Here's the resources, and food used, immediately after starting the 3 juggs (order 1).
![]()
This strategy has the ability to beat any other cookbook strats for X Marks the Spot, or Cross the Streams. Most people will try going with the 2 yard, 4 jugg rush, but will get run over by this. Rushes are easily repelled as long as you have used your buildings to wall them out. The biggest problems you will have are a 3 haller on X Marks, or a 1 Hall power on Cross the Streams. Make sure you don't over build your peons, so you have enough resources to get a catapult, to retake one of the islands.
Click to enlarge (72k)
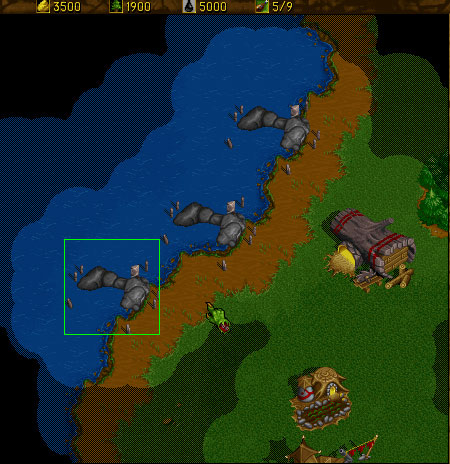
3 yards started for order 1. Notice that 1 more farm will wall enemy grunts outside. |
Click to enlarge (62k)
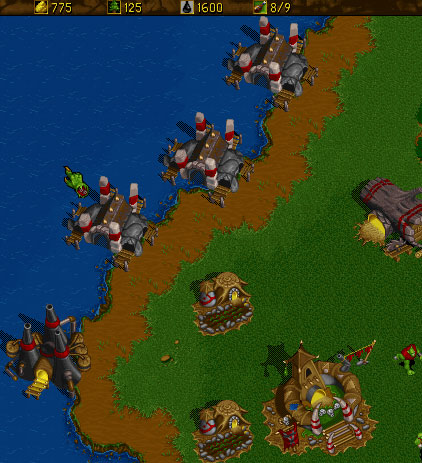
These are ALL of my buildings for the second order. |